FreeBSD A Powerful Alternative to Linux and Windows
When it comes to operating systems, most people think of Windows or Linux, but there’s another powerful option that often flies under the radar—FreeBSD. Built on a rock-solid Unix foundation, FreeBSD is widely known for its performance, security, and flexibility. Whether you’re a server administrator, developer, or a tech enthusiast looking for a reliable OS, FreeBSD offers a compelling alternative that rivals both Linux and Windows.
FreeBSD: A Powerful Alternative to Linux and Windows, is not just for enterprise-grade servers or advanced users—it can be an excellent choice for desktop computing as well. With features like the ZFS file system, an extensive Ports Collection for software installation, and robust networking capabilities, FreeBSD provides a unique blend of power and simplicity. If you’re ready to explore a new world beyond the mainstream operating systems, this guide will help you get started with installing and configuring FreeBSD with ease.
What is FreeBSD?
FreeBSD is a powerful, open-source operating system that serves as a reliable platform for a wide range of computing tasks. It’s based on the Berkeley Software Distribution (BSD), a version of Unix developed at the University of California, Berkeley. FreeBSD is known for its stability, performance, and advanced networking capabilities, making it a popular choice for servers, desktops, and embedded systems.
One of the key strengths of FreeBSD is its focus on simplicity and efficiency. Its design emphasizes clean, well-documented code, which makes it easier for developers to understand and modify. This has also contributed to its reputation for being highly secure and robust, especially in demanding environments.
FreeBSD is not just for tech experts, though. While it’s often used in enterprise settings—like web hosting, databases, and networking—it’s also a great option for individuals who want a fast, customizable operating system for their personal computers. It supports a wide variety of software and hardware, and its package management system makes it easy to install and update applications.
Another standout feature of FreeBSD is its licensing. It’s released under the permissive BSD license, which allows users to freely use, modify, and distribute the software with minimal restrictions. This has made it a favorite among developers and organizations looking for flexibility.
Why Choose FreeBSD?
1: Stability and Speed – FreeBSD is designed for performance and reliability, making it an ideal choice for servers, data centers, and high-end computing.
2: Advanced Networking – With a strong TCP/IP stack, built-in firewall (PF), and Jails for isolation, FreeBSD excels in networking and security.
3: ZFS Support – FreeBSD comes with ZFS, a robust file system that provides data integrity, snapshots, and scalability.
4: Security First – Security features like Jails, Capsicum, and Mandatory Access Control (MAC) help safeguard your system.
5: Highly Portable – FreeBSD supports multiple architectures, including x86, ARM, and PowerPC, making it a flexible OS.
6: Ports and Packages – The FreeBSD Ports Collection offers thousands of software applications that are easy to install and manage.
FreeBSD vs. Linux: What’s Different?
Although both FreeBSD and Linux are Unix-like, they have some key differences:
- Complete OS vs. Kernel – FreeBSD is a full-fledged OS, while Linux is just a kernel that requires additional software.
- Licensing – FreeBSD uses a permissive BSD license, allowing modification without requiring the source code release, unlike Linux’s GPL.
- Package Management – FreeBSD’s Ports system allows users to compile software from source, while Linux relies on binary package managers like APT or YUM.
- Jails vs. Containers – FreeBSD’s Jails provide superior process isolation compared to Linux containers.
What is FreeBSD Used For?
- Web Hosting – Many hosting providers prefer FreeBSD for its performance and security.
- Networking – It’s widely used in networking devices, routers, and firewalls.
- Desktops – While not as user-friendly as Linux, FreeBSD can be customized with desktops like KDE and Xfce.
- Embedded Systems – Companies use FreeBSD in embedded devices and industrial applications.
Getting Started with FreeBSD
System Requirements for Installing FreeBSD
Before installing FreeBSD, ensure your system meets the minimum requirements:
1: Processor: 64-bit (AMD64/Intel64) processor is recommended.
2: RAM: At least 512MB (1GB or more recommended for better performance).
3: Storage: At least 8GB of free disk space.4: Internet Connection: Required for downloading updates and packages.
Pre-Installation Tasks:
Before proceeding with the installation, it’s advisable to:
- Back Up Important Data: Ensure that all critical data is backed up to prevent any loss during the installation process.
- Check Hardware Compatibility: Review the Hardware Compatibility List to confirm that your system’s components are supported.
- Plan Disk Layout: Decide on the disk partitioning scheme, especially if you’re setting up a dual-boot system or have specific storage requirements.
Downloading FreeBSD
To get started, download the latest FreeBSD ISO from the official website:
1: Visit FreeBSD’s download page.
2: Select the appropriate architecture (most modern systems use amd64).
3: Download the ISO file for the latest stable release.
4: Use a tool like Rufus (Windows) or dd (Linux/macOS) to create a bootable USB drive.
How To Install FreeBSD (Steps)

Step 1: Booting from the Installation Media
1: Insert the bootable USB drive and restart your computer.
2: Enter the BIOS/UEFI settings (usually by pressing F2, F12, DEL, or ESC during boot).
3: Set the USB drive as the first boot device and save changes.
4: Reboot the system, and the FreeBSD installer should start.

Step 2: FreeBSD Installer Menu

Once you boot into the installer:
1: Select Install from the menu.
2: Choose your keyboard layout.
3: Enter a hostname for your system.
Step 3: Selecting Components
The installer will prompt you to select additional components. You can keep the default selections or include:
- Ports Collection (for compiling software from source)
- System Source (for development purposes)
Step 4: Disk Partitioning
FreeBSD offers several partitioning methods:
- Auto (UFS): Recommended for beginners. It sets up UFS partitions automatically.
- Auto (ZFS): Select this if you want ZFS features.
- Manual Partitioning: For advanced users who want full control.
- Choose Auto (UFS) for simplicity and continue.
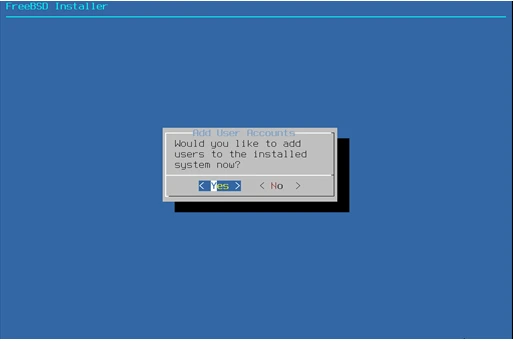
Step 5: Setting Up User Accounts

- Set a root password (use a strong password).
- Create a new user account for daily use.
- Add the user to groups like wheel (for administrative privileges).
Step 6: Configuring Network
- Choose DHCP for automatic network configuration.
- If using Wi-Fi, select the appropriate wireless network and enter the password.
Step 7: Selecting System Services
Enable the necessary services, such as:
- SSH (Secure Shell): Allows remote access.
- NTP (Network Time Protocol): Keeps system time synchronized.
Step 8: Finalizing Installation
- Select your time zone.
- Review the summary and confirm installation.
- Once installation is complete, remove the USB and reboot the system.
Post-Installation Setup for FreeBSD
Logging In
After rebooting, log in with your user credentials.
Updating the System
Run the following commands to update FreeBSD:
freebsd-update fetch install
pkg update
pkg upgrade
Installing a Desktop Environment (Optional)
If you want a graphical interface, install Xorg and a desktop environment (e.g., XFCE):
pkg install xorg xfce xfce4-goodies slim
Enable required services:
echo ‘dbus_enable=”YES”‘ >> /etc/rc.conf
echo ‘slim_enable=”YES”‘ >> /etc/rc.conf
Start the desktop environment:
startx
Installing Essential Software
Use the pkg package manager to install additional software:
pkg install firefox vlc nano
Setting Up Firewall
Enable and configure the firewall for security:
echo ‘firewall_enable=”YES”‘ >> /etc/rc.conf
echo ‘firewall_type=”workstation”‘ >> /etc/rc.conf
service ipfw start
Conclusion
FreeBSD is a powerful and dependable OS with outstanding performance, security, and versatility. Whether you need a server OS, networking powerhouse, or just want to try something new, FreeBSD is worth exploring. Its blend of stability, advanced features, and flexibility makes it a great choice for tech enthusiasts and professionals alike. If you’re looking for a system that offers full control and long-term reliability, FreeBSD is a strong contender. Give it a shot and see how it fits your needs!
Disclaimer
This article is for informational purposes only. While we strive to provide accurate and up-to-date information, technology evolves, and individual experiences may vary. Always refer to the official FreeBSD website and documentation for the latest updates and best practices. We do not take responsibility for any issues that may arise from using FreeBSD or following the instructions provided in this article.
Also Read
Best Linux Desktop Environment for Gaming in 2025


