What is ArcoLinux?
ArcoLinux is an Arch-based Linux distribution designed to cater to both beginners and advanced users. Unlike vanilla Arch Linux, which requires users to manually set up the system from scratch, ArcoLinux offers a more user-friendly approach while maintaining the flexibility and power of Arch. It comes with pre-configured desktop environments, extensive documentation, and different installation modes to suit varying levels of expertise.
The project is led by Erik Dubois, who has been instrumental in creating an extensive learning path for users to explore Arch Linux through ArcoLinux. This distribution is perfect for those who want to learn Arch Linux without immediately diving into the complexities of a manual installation. In this article, we provide an in-depth look at ArcoLinux Explained—covering its key features, installation process, and why it stands out among Arch-based Linux distributions.
Variants of ArcoLinux
1. ArcoLinux (Full Version)
This is the flagship version of ArcoLinux and is designed for users who want a complete and feature-rich experience out of the box. It comes pre-installed with:
- XFCE (default), Openbox, and i3 window managers
- A variety of productivity tools and multimedia applications
- Pre-configured settings for an optimal experience
- Learning scripts to help users transition into Arch Linux
ArcoLinux is ideal for users who want a ready-to-use system with the flexibility to explore different desktop environments and window managers.
2. ArcoLinuxL (Light Version)
ArcoLinuxL is a stripped-down version of the full ArcoLinux edition. It retains the essential features but removes unnecessary packages, making it lighter and more customizable. Users can install additional software based on their needs.
Key Features:
- Lighter than ArcoLinux
- Comes with XFCE as the default desktop environment
- Suitable for users who want a balance between a pre-configured system and customizability
3. ArcoLinuxS (Small Version)
ArcoLinuxS (Small) is a minimalistic version that allows users to install only what they need. It provides a clean slate for those who want to control every aspect of their system’s configuration.
Key Features:
- Minimal base system
- No pre-installed applications except core utilities
- Ideal for advanced users who prefer a lightweight and clean setup
4. ArcoLinuxB (Build Your Own)
ArcoLinuxB is a variant designed for users who want to create their own customized version of ArcoLinux. It allows users to choose a specific desktop environment and fine-tune the software selection before installation.
Key Features:
- Users can select from multiple desktop environments like KDE, GNOME, Cinnamon, Budgie, etc.
- Provides ISO building scripts for complete customization
- Best suited for users who want to tailor their OS to specific needs
5. ArcoLinuxD (Do-It-Yourself)
ArcoLinuxD is the most advanced variant, providing a bare minimum installation with just the Arch Linux base and essential utilities. It is meant for users who want to build their system entirely from scratch, selecting only the software and desktop environment they require.
Key Features:
- Only includes the core system and essential packages
- No pre-installed desktop environment
- Ideal for experienced Linux users and Arch Linux enthusiasts
Choosing the Right ArcoLinux Variant
The right ArcoLinux variant depends on your level of experience and what you want from your system:
- Beginner or casual user → ArcoLinux (Full Version)
- User who wants a lightweight system → ArcoLinuxL
- Minimalist who prefers manual software selection → ArcoLinuxS
- Custom OS builder → ArcoLinuxB
- Advanced user wanting full control → ArcoLinuxD
When choosing a variant, it is important to consider what specific tasks and uses you will be performing with your computer. If you are a beginner, it is recommended to start with the base ArcoLinuxL variant and gradually add additional software as needed. If you have specific needs, such as development or multimedia work, then the appropriate variant will likely be the best choice.
There are many features available in ArcoLinux, some of it given below: –
Features Of ArcoLinux
1. Multiple Installation Options: Choose What Suits You
One of the standout features of ArcoLinux is its variety of installation options. Unlike vanilla Arch, which requires a manual setup, ArcoLinux provides multiple ways to install the system:
- ArcoLinux (Full Version) – Comes with pre-installed applications, desktop environments, and customization tools. Ideal for users who want everything out of the box.
- ArcoLinuxD (Minimal Version) – A barebones installation that lets you install only what you need. Perfect for advanced users who like to build their system from the ground up.
- ArcoLinuxB (Community Builds) – This option allows you to create your own customized ISO with specific desktop environments and software packages.
This flexibility makes ArcoLinux appealing to both beginners and advanced users.
2. Wide Range of Desktop Environments
Unlike some Linux distributions that limit you to one or two desktop environments, ArcoLinux supports multiple options, including:
- Xfce – Lightweight and efficient, great for older hardware.
- Plasma (KDE) – A visually stunning and feature-rich desktop.
- GNOME – Modern and minimalistic, with a focus on simplicity.
- i3, Openbox, Awesome WM – For those who prefer tiling window managers or lightweight environments.
This level of choice means you can tailor your system to match your workflow and preferences.
3. Rolling Release Model: Always Up-to-Date
Like Arch Linux, ArcoLinux follows a rolling release model, meaning you always get the latest software and security updates without needing to reinstall your OS. This ensures that your system remains cutting-edge while maintaining stability.
4. Ease of Use: Pre-Configured Yet Customizable
Even though ArcoLinux is Arch-based, it aims to simplify the experience without taking away the core Arch philosophy. Some features that make it user-friendly include:
- Pre-installed essential applications like a file manager, terminal, and multimedia tools.
- Calamares Installer – A graphical installation tool that makes setting up ArcoLinux as easy as installing Ubuntu or Manjaro.
- Pre-configured settings for a smoother out-of-the-box experience.
At the same time, advanced users can strip it down and customize every aspect of the system.
5. ArcoLinux Tweak Tool: Simplifying Customization
The ArcoLinux Tweak Tool is an exclusive feature that lets you:
- Switch between multiple desktop environments.
- Install and remove software easily.
- Change system settings without diving into complex terminal commands.
This tool makes ArcoLinux even more accessible, especially for users who are new to Arch-based systems.
6. Strong Community and Learning Resources
ArcoLinux goes beyond just being a Linux distribution—it also serves as a learning platform. The ArcoLinux project provides:
- Extensive documentation and tutorials.
- YouTube videos explaining installation, customization, and troubleshooting.
- A supportive community where users can seek help and share their experiences.
If you’re someone who wants to learn more about Linux, ArcoLinux is a fantastic choice because it encourages you to explore and experiment.
7. Performance and Stability
Since ArcoLinux is based on Arch, it benefits from:
- High performance, thanks to its lightweight base.
- Rolling updates, ensuring access to the latest packages.
- A balance of stability and cutting-edge software, making it suitable for both daily use and power users.
Even with the latest updates, ArcoLinux remains stable because of the curated package selection and strong community support.
8. Pacman and AUR: Access to a Massive Software Repository
ArcoLinux uses Pacman, Arch Linux’s powerful package manager, making software installation fast and efficient. Additionally, users can enable the Arch User Repository (AUR), which provides access to thousands of extra software packages contributed by the community.
This means you get an extensive selection of applications, whether you’re looking for mainstream software or niche tools.
9. Custom ISO Creation: Build Your Own Linux Distribution
One of the most exciting features of ArcoLinux is the ability to build your own ISO with the ArcoLinuxB project. If you want to create a customized version of ArcoLinux with specific desktop environments and software, you can do so easily using the ArcoLinux tools.
This is particularly useful for:
- Advanced users who want a personalized setup.
- IT professionals who need custom Linux distributions for their teams.
- Linux enthusiasts who want to experiment with different configurations.
System Requirements For ArcoLinux
| Processor | 64 Bit Architecture |
| Memory | 1 GB |
| Disk Space | 20 GB |
| System Firmware | Legacy BIOS Or UEFI |
| Display | 1025*768 Screen Resolution |
| Internet Connection | Require for ArcoLinuxD, ArcoLinuxB and ArcoLinuxS |
Installation Process for ArcoLinux
Step 1
The first step in installing ArcolinuxL is to download the ISO image from the Arcolinux official website. Once the image is downloaded, it can be burned to a USB drive using a free tool like Rufus or Balena Etcher.
Step 2
Once the USB drive is created, it can be used to boot the computer. Insert the USB drive into the computer and reboot. Press F8 or F12 (depends on your BIOS setting) to select boot menu and select USB drive to boot.
Step 3
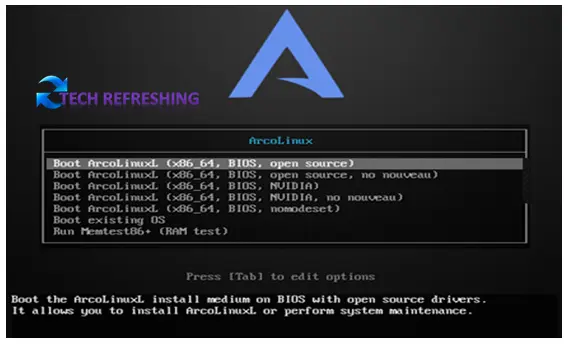
Select Boot ArcoLinuxL (x86_64, BIOS, open source) then press Enter to boot into Live Environment.
Step 4
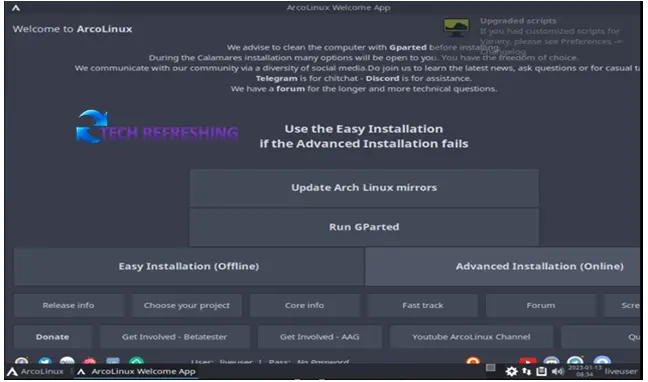
Now you are boot into the ArcoLinux Live environment. Click on “Easy Installation (Offline)” icon to start installation process. Internet is not necessary for ArcoLinuxL.
If you chose Advance Installation then you have a choice to install software, Desktop Environment, Drivers and many tools while installation. But the same things you can do it after installation complete. I suggest go with Easy Installation option; it will save time.
Step 5
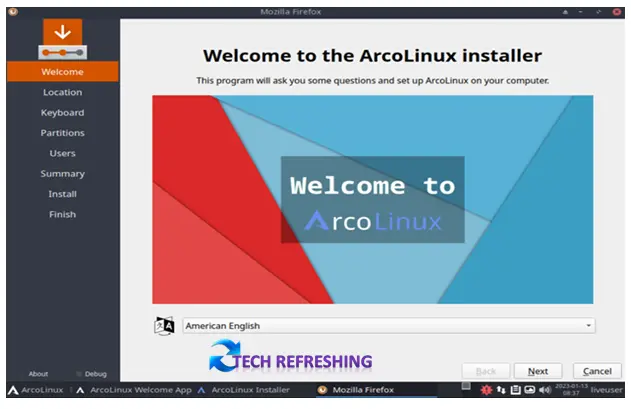
Now you come to the Welcome screen of ArcoLinux Installer, here select Language and click on Next.
Step 6
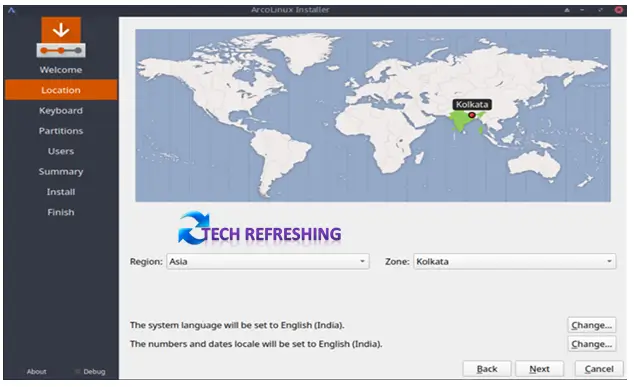
Once the Language selection is complete, the user will be prompted to select the time zone. Select the time zone that the user is in and then click on Next.
Step 7
Select Keyboard Layout and then Click on Next.
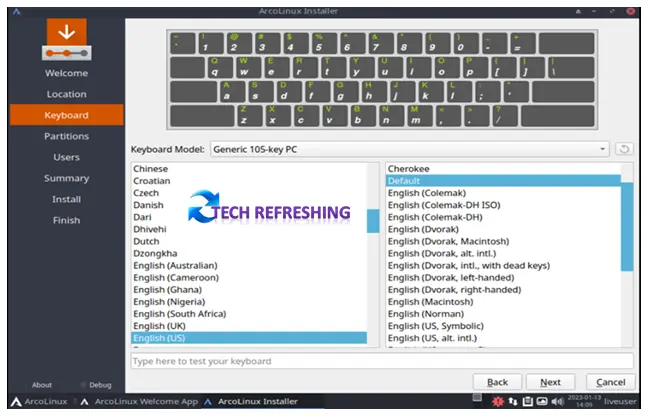
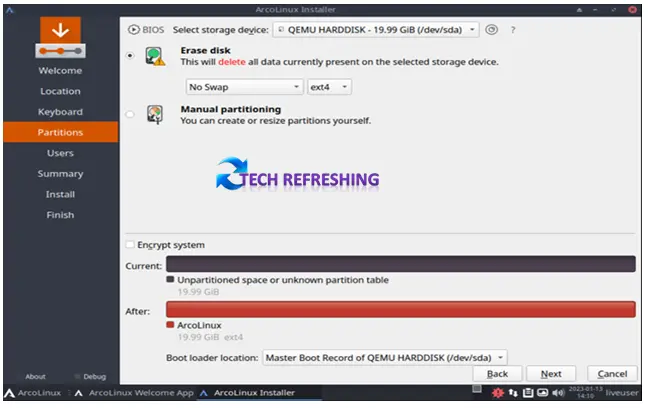
Step 8
The next step is to partition the hard drive. The user will be prompted to select the type of partitioning they want to perform. The user should select Erase Disk and click on Next.
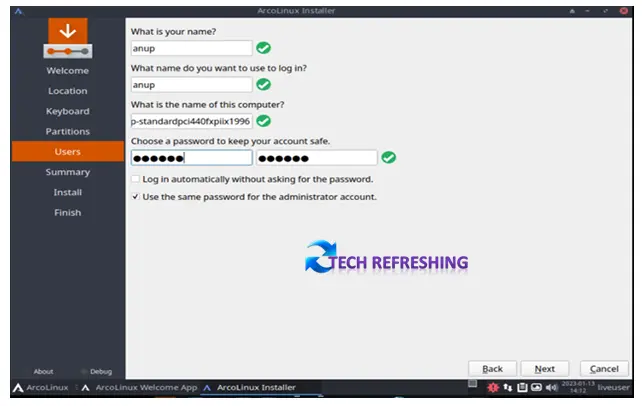
Step 9
The next step is to create a user account. The user will be prompted to enter a username, password, and other information. This user account will be the account that the user will use to log into the system after the installation is complete. Also set a password for Administrator account or you can use same password. After creating User account and password click on Next.
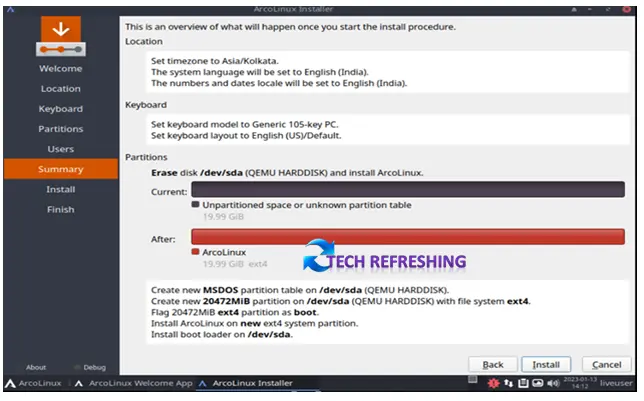
Step 10
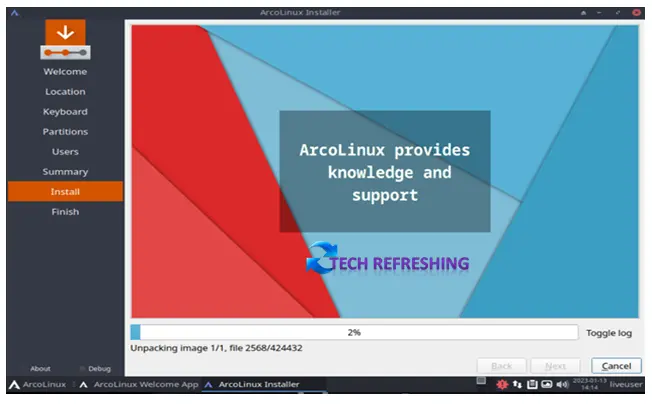
Now the summary page will be shown, here click on Install and then click on Install now (when prompted) to start the installation.
Once all of the options have been selected, the installation process will begin. The installation process will take some time, depending on the speed of the computer and the amount of data that needs to be installed.
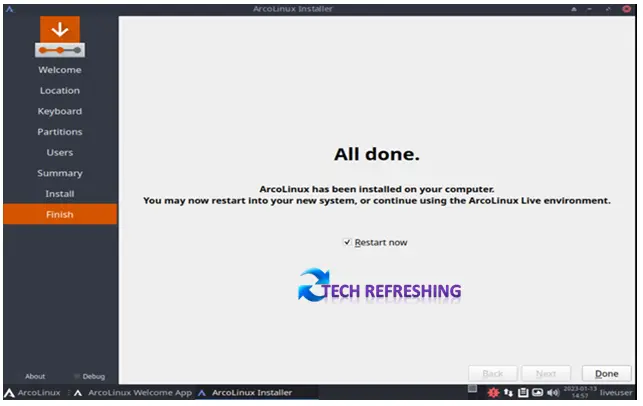
Once the installation is complete, the user will be prompted to reboot the system. Here Click on Restart Now then click on Done to Restart the computer. Remove the USB drive and reboot the computer. The computer should now boot into ArcoLinux.
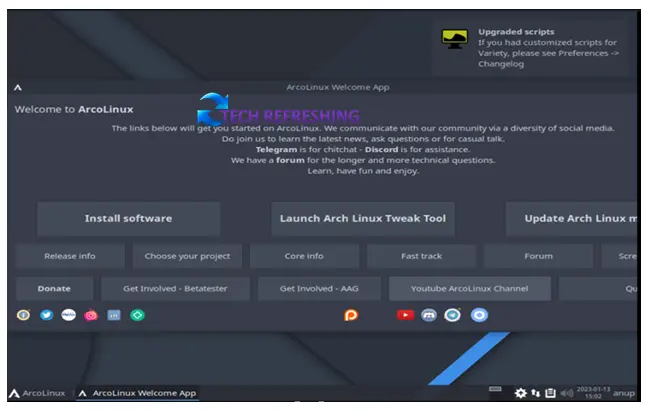
After completion of Installation process you will boot into the login screen. Type your user ID and password then press enter key to entered into ArcoLinux . Now select Update option to update ArcoLinux from Welcome Screen. From welcome screen you also can install desired software. The installation process is very simple and very easy to use. But if are facing any problem regarding installation then you can visit ArcoLinux website for more help and assistance.
Post-Installation Tips
After installing ArcoLinux, here are some essential steps to enhance your experience:
1. Update the System
sudo pacman -Syu
2. Install Additional Software
sudo pacman -S package_name
Replace package_name with the software you need.
3. Enable AUR Support (for pamac GUI users)
sudo pacman -S yay
Then install AUR packages using:
yay -S package_name
4. Customize Your Desktop
- Install new themes and icons.
- Configure desktop settings using the respective desktop environment tools.
5. Join the ArcoLinux Community
- Visit the ArcoLinux forum for support.
- Check out video tutorials to deepen your understanding.
Conclusion
Arcolinux is a user-friendly and lightweight Linux distribution based on Arch Linux. It is designed for people who are looking for a simple and easy-to-use operating system that is based on Arch Linux. Arcolinux is also a great option for those who are new to Linux and want to try out a distribution that is based on Arch Linux.
The installation process is simple and straightforward, making it easy for users to get started with the distribution. With its easy to use interface, lightweight design, and regular updates, Arcolinux is a great choice for users looking for a reliable and user-friendly Linux distribution.
Disclaimer
This article is for informational purposes only. The installation process, features, and software mentioned are subject to change. Users should always refer to the official ArcoLinux documentation and website for the latest updates and support. The author is not responsible for any data loss, system issues, or other consequences resulting from following this guide.
Also Read
Top Linux Distros for Math Enthusiasts in 2025 – Find Your Perfect OS!


