In today’s world, many users prefer to enjoy the best of both worlds by having Windows 11 and a Linux distribution installed on the same machine. Dual-booting gives you the flexibility of running both operating systems on a single machine. This guide will walk you through the entire process of dual boot Windows 11 and Linux, specifically Archman XFCE Edition 2024-12 Stable Version.
We’ll provide a detailed step-by-step process for beginners, ensuring that anyone with basic computing knowledge can follow along without a hitch.
What Is Dual Booting?
Dual booting refers to the installation of two operating systems on the same computer, allowing the user to choose which one to boot into when the computer starts. This setup is particularly useful for users who want to:
- Explore Linux without abandoning Windows.
- Use Linux for development tasks and Windows for gaming or specific applications.
- Transition to Linux gradually without fully committing to a single OS.
Why Dual Boot Windows 11 and Linux?
Before diving into the installation steps, it’s essential to understand the advantages of dual-booting:
1: Flexibility: Each OS has its strengths, and dual-booting allows you to utilize both.
- Windows 11 is perfect for gaming, specialized software, and general consumer use.
- Linux provides a more customizable, open-source environment with superior control over your system.
2: Learning: For anyone looking to switch to Linux or get into Linux development, dual-booting offers an excellent way to start. You can explore Linux without giving up Windows entirely.
3: Performance: Running Linux on a dedicated partition allows you to use it at full performance, without the overhead of running it in a virtual machine.
Now, let’s get started with the installation process.
Prerequisites installing Archman XFCE alongside Windows 11
Before we begin installing Archman XFCE alongside Windows 11, ensure you have the following:
1: A computer running Windows 11.
2: A USB drive with at least 4GB of free space (for creating the Linux installation media).
3: A backup of your Windows data. While dual-booting is generally safe, it’s always best to back up important data before proceeding with partitioning or OS installation.
4: A stable internet connection for downloading necessary files.
5: Basic understanding of BIOS/UEFI and partitioning. Don’t worry if you’re a beginner, as we’ll guide you through the process.
Dual Boot Windows 11 and Linux (Archman XFCE Edition 2024-12 Stable Version)
Step 1: Prepare the Partition for Linux Installation
1: Freeing up space on your drive:
- Open Disk Management in Windows (Right-click the Start Menu and select “Disk Management”).
- Right-click the partition where Windows is installed (usually the C drive) and choose Shrink Volume.
- Decide how much space you want to allocate to Linux. A minimum of 20GB is recommended for a smooth experience.
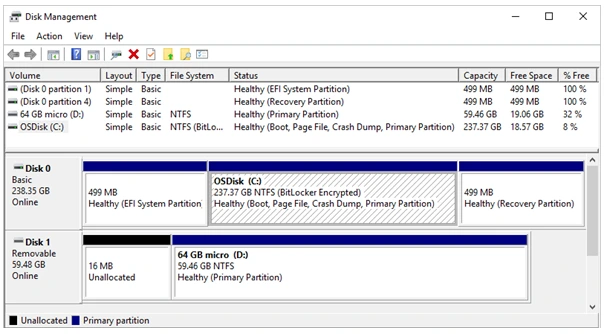
Tip: Ensure you leave at least 100GB or more if you plan to use Linux for more than just testing purposes.
2: Create unallocated space: Once you shrink the partition, you’ll have unallocated space that will be used for Linux. Don’t format this space; it will be formatted during the Linux installation.
Step 2: Create a Bootable USB Drive for Archman XFCE
1: Download the Archman XFCE 2024-12 Stable ISO: Visit the official website or a reliable source to download the Archman XFCE 2024-12 Stable ISO. Ensure you’re downloading the correct version for your system architecture (x64).
2: Create a Bootable USB:
- Download and install Rufus or Balena Etcher, both of which are free tools for creating bootable USB drives.
- Insert your USB drive and launch the tool of your choice.
- Select the Archman XFCE ISO file and your USB drive.
- Start the process to create the bootable drive.
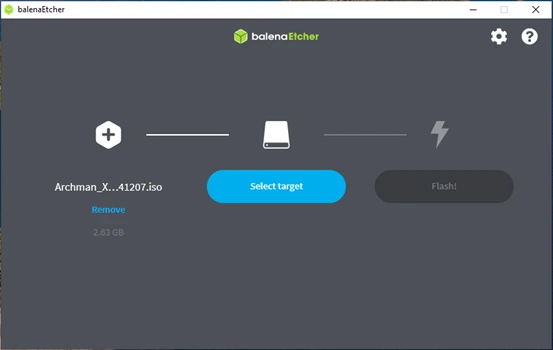
Tip: Ensure that the USB drive is formatted to FAT32 for compatibility.
Step 3: Boot from the USB Drive
1: Reboot the System and Enter BIOS/UEFI:
- Restart your computer and enter the BIOS/UEFI settings by pressing the designated key (usually F2, DEL, or ESC depending on your manufacturer).
- In the BIOS, set the boot priority to boot from the USB drive first.
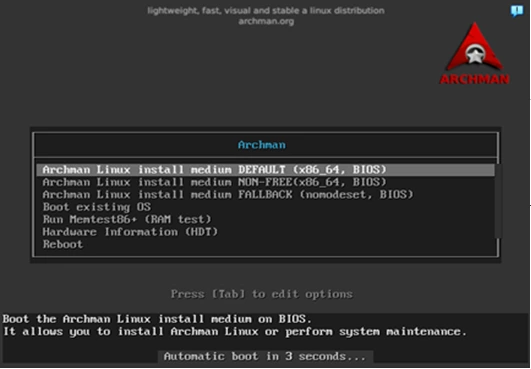
2: Boot into the Archman XFCE Installer:
- Save the changes and reboot. Your computer should boot from the USB drive, and you should see the Archman XFCE installer.
- Select the Live Session option to begin the installation process.
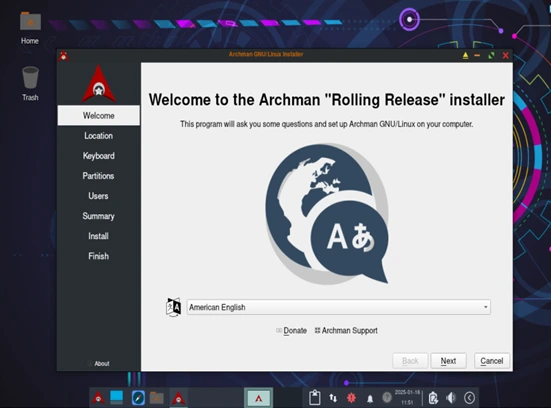
Step 4: Install Archman XFCE
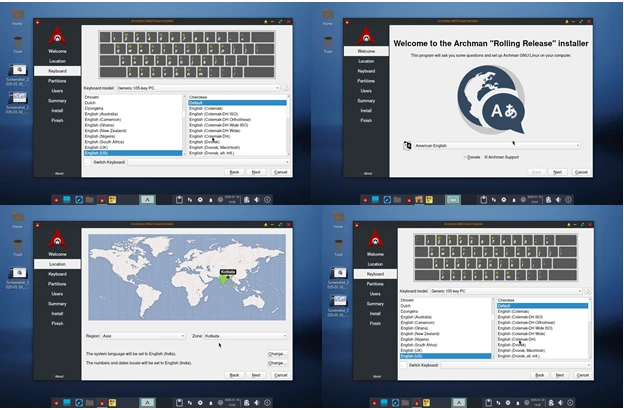
1: Choose the Installation Language and Region:
- Select your preferred language, time zone, and keyboard layout in the installation wizard.
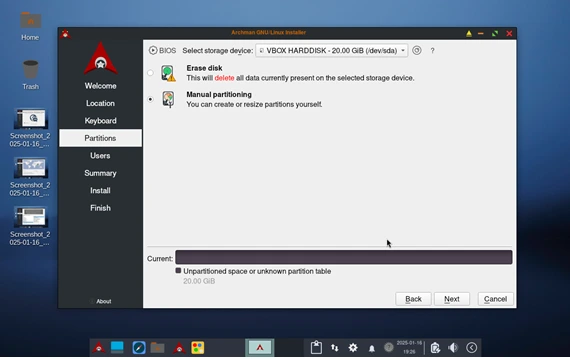
2: Partitioning the Disk:
- You’ll now reach the Partitioning stage. Choose the option to install Archman XFCE alongside Windows 11.
- The installer will automatically detect the unallocated space and create the necessary partitions for Linux.
- If you want to manually partition the disk, you can use the GParted tool to create a root partition (/) and a swap partition.
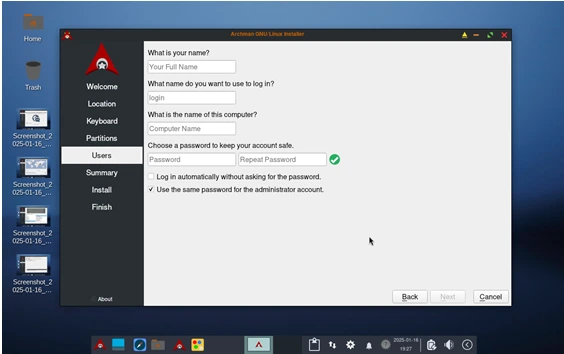
3: Set up the Root Password and User:
- The installer will prompt you to create a root password (for administrative tasks) and a regular user account. Be sure to choose a strong password and remember it.
4: Install the Bootloader (GRUB):
- When prompted, install the GRUB bootloader to the master boot record (MBR). This is crucial as GRUB will allow you to choose between Windows 11 and Archman XFCE at boot time.
Important: Don’t install GRUB to a partition; it must go to the MBR to manage both operating systems.
5: Complete the Installation:
- Follow the remaining prompts to complete the installation. The system will install Archman XFCE, configure the bootloader, and set up your Linux environment.
- Once the installation finishes, you’ll be prompted to remove the installation media and reboot.
Step 5: Configure the Boot Loader (GRUB)
1: Reboot and Select the Operating System:
- After rebooting, you should now see the GRUB menu. GRUB will list both Windows 11 and Archman XFCE as boot options.
- Use the arrow keys to select which OS you want to boot into.
2: Test Both Operating Systems:
- Test both Windows 11 and Archman XFCE by booting into each one. You should be able to switch between them seamlessly.
Step 6: Post-Installation Setup on Archman XFCE
1: Install Updates on Archman XFCE:
- Once you boot into Archman XFCE, it’s crucial to update your system. Open the terminal and run:
sudo pacman -Syu
This command will update all packages and ensure your system is up-to-date.
2: Install Necessary Software:
- Archman XFCE comes with a basic set of applications, but you may want to install additional software. Use the following commands to install your favorite apps:
sudo pacman -S firefox vlc gimp
3: Configure GRUB (Optional):
- If you want to tweak the GRUB boot menu, you can modify the /etc/default/grub file. For example, you can set a default boot entry or change the timeout value.
- After editing, run the following to update GRUB:
sudo grub-mkconfig -o /boot/grub/grub.cfg
Troubleshooting Tips for Dual Boot Windows 11 and Linux:
1: Missing GRUB Menu: If the GRUB menu doesn’t appear, you may need to repair the bootloader. You can boot from the Archman XFCE USB again and run the following commands to reinstall GRUB:
sudo mount /dev/sdX1 /mnt # Mount your Linux root partition
sudo mount –bind /dev /mnt/dev
sudo mount –bind /proc /mnt/proc
sudo mount –bind /sys /mnt/sys
sudo chroot /mnt
sudo grub-install /dev/sda # Adjust to your disk
sudo grub-mkconfig -o /boot/grub/grub.cfg
2: Windows Booting Issues: If Windows 11 doesn’t boot after installing Linux, boot into a live Linux session and use Boot-Repair or GRUB to repair the bootloader.
Conclusion:
Congratulations! You’ve successfully set up dual-booting with Windows 11 and Archman XFCE 2024-12 Stable Edition. You now have the best of both worlds: the versatility and power of Linux, alongside the gaming and application compatibility of Windows 11.
Remember to back up your important data and regularly update your systems. Enjoy your journey into Linux, and feel free to experiment with different distros in the future.
Happy dual booting!
Disclaimer:
The information provided in this guide is intended for educational purposes only. While every effort has been made to ensure accuracy, the process of dual-booting involves modifying system partitions and bootloaders, which can lead to data loss or system instability if not performed correctly. Always back up your important data before proceeding with any installation or partitioning process.
The author and this website are not responsible for any damage, data loss, or issues that may arise from following this guide. It is essential to fully understand each step of the process and ensure that you are comfortable with the procedure. If you are unsure about any part of the installation, consider seeking assistance from a professional or consulting the official documentation for both Windows 11 and Archman XFCE.
By following this guide, you acknowledge and accept the risks associated with dual-booting and proceed at your own discretion.
Also Read
How to Set Up a Dual-Boot System with Chrome OS and Linux

