If you’re looking for a way to turn FreeBSD into a powerful and user-friendly workstation, this guide on How to Set Up a FreeBSD Desktop Environment (XFCE, KDE, GNOME) is exactly what you need. While FreeBSD is often known for its stability and performance in server environments, it also offers great flexibility as a desktop operating system.
Unlike mainstream Linux distributions, FreeBSD gives users full control over their system configuration. With the right desktop environment, you can enjoy a visually appealing, efficient, and highly customizable computing experience. Whether you prefer the lightweight and responsive XFCE, the feature-rich KDE Plasma, or the modern GNOME interface, FreeBSD has you covered.
A desktop environment (DE) provides a graphical interface that makes it easier to interact with the system. Instead of relying solely on command-line operations, users can navigate through windows, menus, and graphical applications. Whether you prefer the lightweight performance of XFCE, the feature-rich customization of KDE Plasma, or the modern simplicity of GNOME, FreeBSD supports all three.
In this step-by-step guide, we’ll cover the installation and setup of each desktop environment, ensuring that you can choose the best fit for your workflow. Let’s get started!
What is a Desktop Environment?
A desktop environment is essentially a complete graphical user interface (GUI) for your operating system. It includes things like:
- A window manager to handle open applications
- A taskbar or dock for launching apps
- A file manager for navigating files and folders
- System utilities like settings menus, notification centers, and more
Think of it as a complete package that transforms FreeBSD from a blank terminal into a fully functioning desktop system.
Why Use a Desktop Environment in FreeBSD?
Since FreeBSD starts with just a CLI, a DE makes it easier to use—especially for those who prefer a graphical experience over typing commands. Here’s why you should consider installing one:
1. User-Friendly Experience
A desktop environment makes FreeBSD more accessible by providing menus, icons, and a familiar interface that most people are used to.
2. Boosts Productivity
With features like multiple workspaces, drag-and-drop functionality, and a customizable UI, a DE can make multitasking more efficient.
3. Customization Galore
Unlike Windows or macOS, where you’re stuck with a default look, FreeBSD lets you choose a DE that matches your preferences—whether you want something lightweight like Xfce or a feature-packed experience like KDE Plasma.
4. Better Software Compatibility
Many applications are designed with a GUI in mind, and using a DE ensures that everything works as expected.
5. Easier System Management
Sure, you can manage everything through the command line, but having a GUI for system settings makes life easier—especially for new users.
Best Desktop Environments for FreeBSD
FreeBSD supports a variety of DEs, each with its own strengths. Here are some of the top choices:
- GNOME – A modern, polished DE with a sleek interface
- KDE Plasma – Highly customizable and packed with features
- Xfce – Lightweight and fast, great for older hardware
- MATE – A traditional, straightforward experience
- LXQt – Minimalist and efficient, perfect for performance-focused users
How to Set Up a FreeBSD Desktop Environment (XFCE, KDE, GNOME)
Prerequisites
Before installing a desktop environment, ensure your FreeBSD system is updated. Open the terminal and run the following commands:
# freebsd-update fetch
# freebsd-update install
Next, install the X Window System (Xorg), which is essential for running any graphical user interface:
# pkg install xorg
After installation, you need to enable essential services such as dbus and hald by adding these lines to /etc/rc.conf:
dbus_enable=”YES”
hald_enable=”YES”
Mount the /proc filesystem at startup by adding the following line to /etc/fstab:
proc /proc procfs rw 0 0
Now, let’s proceed with installing and configuring your preferred desktop environment.
1. Setting Up XFCE on FreeBSD: A Beginner-Friendly Guide
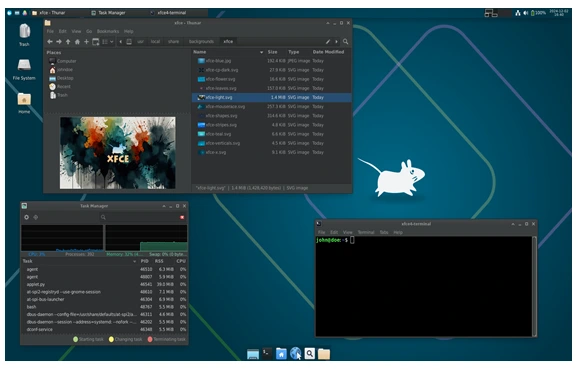
FreeBSD is a powerful and flexible operating system, but it doesn’t come with a graphical user interface (GUI) by default. If you’re looking for a lightweight and customizable desktop environment, XFCE is a great choice. In this guide, we’ll walk you through setting up XFCE on FreeBSD step by step.

Prerequisites
Before we start, make sure you have:
- A running installation of FreeBSD.
- Root or sudo access.
- An active internet connection.
Step 1: Update Your System
It’s always a good idea to update your system before installing new software. Open the terminal and run:
sudo pkg update && sudo pkg upgrade
This ensures that you have the latest packages and security updates.
Step 2: Install XFCE and Dependencies
To install XFCE, use the following command:
sudo pkg install xfce
Since XFCE doesn’t come with a display manager by default, we’ll also install slim as our login manager:
sudo pkg install slim slim-themes
Step 3: Enable Necessary Services
Now, we need to enable the dbus and slim services so that they start automatically at boot. Run:
sudo sysrc dbus_enable=”YES”
sudo sysrc slim_enable=”YES”
Start the dbus service immediately:
sudo service dbus start
Step 4: Configure the .xinitrc File
For XFCE to start properly when you log in, create or modify your ~/.xinitrc file:
echo “exec startxfce4” > ~/.xinitrc
If you want this change to apply to all users, edit /usr/local/etc/slim.conf and ensure the line login_cmd points to startxfce4:
login_cmd exec /bin/sh -l -c “exec startxfce4”
Step 5: Start the GUI
You’re now ready to launch XFCE. If you installed slim, simply start it with:
sudo service slim start
Alternatively, if you prefer starting XFCE manually, use:
startx
Step 6: Customize Your XFCE Experience
Once XFCE loads, you can personalize it to your liking:
- Themes & Icons: Go to Settings > Appearance to change themes.
- Panel Configuration: Right-click the panel to adjust its size, layout, and widgets.
- Applications & Performance Tweaks: Use Task Manager to monitor system resource usage and disable unnecessary startup applications.
Setting up XFCE on FreeBSD is straightforward and gives you a lightweight yet feature-rich desktop environment. Whether you’re using FreeBSD as a daily driver or for specific tasks, XFCE provides a familiar and efficient workflow. Try it out and tweak it to match your needs!
2. Setting Up KDE Plasma on FreeBSD: A Step-by-Step Guide
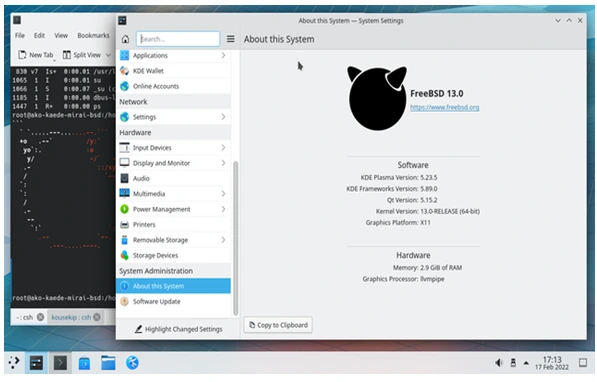
KDE Plasma is one of the most popular desktop environments, known for its modern look, high customizability, and efficiency. If you’re using FreeBSD and want to set up KDE Plasma, this guide will take you through the process step by step.

Prerequisites
Before we begin, ensure you have:
- A working installation of FreeBSD (preferably the latest version).
- Root or sudo access.
- An internet connection to download packages.
Step 1: Update the System
First, update your FreeBSD system to ensure you have the latest packages:
sudo freebsd-update fetch install
sudo pkg update && sudo pkg upgrade
Step 2: Install KDE Plasma
KDE Plasma is available in FreeBSD’s package repository. You can install it using the package manager:
sudo pkg install xorg kde5
- xorg provides the necessary X Window System components.
- kde5 includes the full KDE Plasma desktop environment.
Alternatively, if you prefer using ports, install KDE Plasma by running:
cd /usr/ports/x11/kde5
sudo make install clean
This method takes longer since it compiles KDE from source but allows more customization.
Step 3: Enable Services
To ensure KDE Plasma starts properly, enable the necessary system services:
sudo sysrc dbus_enable=”YES”
sudo sysrc hald_enable=”YES”
sudo sysrc sddm_enable=”YES”
- dbus is an interprocess communication system required for KDE.
- hald is the hardware abstraction layer.
- sddm is the recommended display manager for KDE Plasma.
Now, start these services:
sudo service dbus start
sudo service hald start
sudo service sddm start
Step 4: Configure .xinitrc (Optional)
If you prefer starting KDE Plasma manually using startx, add the following line to your ~/.xinitrc file:
echo “exec startkde” > ~/.xinitrc
Then, start KDE Plasma by running:
startx
Step 5: Reboot and Enjoy KDE Plasma
To finalize the setup, reboot your system:
sudo reboot
Once the system restarts, you should be greeted with the KDE Plasma login screen. Log in and enjoy your new FreeBSD-powered KDE experience!
Setting up KDE Plasma on FreeBSD is straightforward with just a few commands. Whether you’re looking for a modern desktop environment or a customizable workspace, KDE Plasma is a great choice for FreeBSD users. Happy computing!
3. Setting Up GNOME on FreeBSD: A Step-by-Step Guide
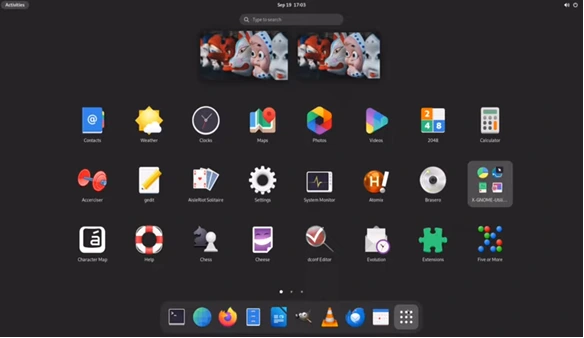
If you’re a FreeBSD user looking to install and configure the GNOME desktop environment, you’ve come to the right place. GNOME provides a modern and user-friendly interface, making it a great choice for those who want a more graphical experience on FreeBSD. In this guide, we’ll walk you through the installation and setup process.

Prerequisites
Before installing GNOME, make sure you have:
- A working FreeBSD installation.
- Root or superuser privileges.
- An active internet connection.
Step 1: Update Your System
First, update your FreeBSD system to ensure you have the latest packages:
pkg update && pkg upgrade
Step 2: Install GNOME
To install GNOME and its necessary components, run the following command:
pkg install gnome gdm xorg
This will install GNOME, the GNOME Display Manager (GDM), and the Xorg display server.
Step 3: Enable Required Services
For GNOME to function properly, you need to enable certain system services. Add these lines to /etc/rc.conf:
echo ‘dbus_enable=”YES”‘ >> /etc/rc.conf
echo ‘hald_enable=”YES”‘ >> /etc/rc.conf
echo ‘gdm_enable=”YES”‘ >> /etc/rc.conf
echo ‘gnome_enable=”YES”‘ >> /etc/rc.conf
Then, start these services manually for the current session:
service dbus start
service hald start
service gdm start
Step 4: Configure Xorg
FreeBSD usually detects your graphics settings automatically, but if you experience issues, you can generate an Xorg configuration file:
Xorg -configure
mv /root/xorg.conf.new /etc/X11/xorg.conf
Step 5: Start GNOME
Once everything is set up, you can start GNOME by rebooting your system:
reboot
After rebooting, GDM should start automatically, and you can log in to your new GNOME desktop.
Troubleshooting
- No Display on Login? Ensure that GDM is enabled and running (service gdm status).
- Keyboard/Mouse Issues? Restart hald (service hald restart).
- Slow Performance? Check your GPU drivers and ensure they are properly configured.
That’s it! You’ve successfully installed and configured GNOME on FreeBSD. Now, enjoy a modern desktop experience with the power and stability of FreeBSD underneath. If you run into any issues, FreeBSD’s official documentation and forums are great resources for troubleshooting.
Conclusion
By following these steps, you can set up a fully functional desktop environment on FreeBSD. Whether you prefer the lightweight efficiency of XFCE, the feature-rich KDE Plasma, or the modern simplicity of GNOME, FreeBSD provides all the tools necessary to build a customized and powerful desktop experience. Choose the one that best suits your needs and enjoy using FreeBSD as a desktop OS!
Disclaimer
The information provided in this guide is for educational and informational purposes only. While every effort has been made to ensure accuracy, we do not guarantee that the steps outlined will work in every situation. FreeBSD configurations may vary based on hardware, software versions, and individual system settings. Always back up important data before making significant system changes. Use this guide at your own risk, and consult the official FreeBSD documentation for further details.
Also Read
FreeBSD: A Powerful Alternative to Linux and Windows


Comments are closed.