

Imagine putting in hours of effort to create amazing blog posts, only to realize that Google isn’t indexing them! It’s frustrating, right? If you’ve stumbled upon the error “New reasons prevent pages in a sitemap from being indexed on site” in Google Search Console, you’re not alone. Many Blogger users face this issue, and it can significantly impact your website’s visibility in search results.
But don’t worry! In this guide, we’ll walk you through why this happens and, more importantly, how to fix it step by step. Whether it’s a problem with your sitemap, robots.txt file, or Google’s crawling behavior, we’ve got you covered with simple solutions to get your pages indexed quickly.
Why Is Google Not Indexing Your Sitemap?
Google Search Console provides detailed indexing reports for your site. If some of your pages are not getting indexed, there could be several reasons:
1: Crawled – Currently Not Indexed: Google has crawled your page but decided not to index it yet.
2: Discovered – Currently Not Indexed: Google found the page but has not crawled it.
3: Blocked by robots.txt: Your website’s robots.txt file may be preventing Google from accessing certain pages.
4: Noindex Tag Detected: A noindex tag in the page’s meta settings may be blocking indexing.
5: Low-Quality Content: Google might have ignored your page due to thin or duplicate content.
6: Canonical Issues: If you have canonical tags pointing elsewhere, Google may not index duplicate or similar pages.
Step 1: Check Google Search Console for Specific Errors
Before fixing the issue, you need to find out why Google isn’t indexing your pages:
1: Go to Google Search Console.
2: Click on Pages under the “Indexing” section.
3: Look at the pages marked as Excluded and review the specific errors.
4: Click on any affected URL to see the exact reason Google has not indexed it.
Once you identify the issue, you can proceed with the fixes below.

Step 2: Submit the Correct Sitemap
Your sitemap helps Google understand your website structure. If it’s incorrect or missing, Google may struggle to index your pages properly.
1: How to Submit or Update Your Sitemap in Google Search Console:
2: Open Google Search Console.
3: Go to Sitemaps under the “Indexing” section.
4: Enter your sitemap URL, which should be:

or, if using a custom domain:

5: Click Submit and wait for Google to process it.
Fix Sitemap Issues for Large Blogger Sites
If you have a lot of blog posts, your main sitemap might not include all of them. In that case, submit paginated sitemaps like:

This ensures Google indexes all posts.
Step 3: Check and Fix Robots.txt File
The robots.txt file tells search engines which pages to crawl and which to ignore. A misconfigured robots.txt can block Google from indexing your site.
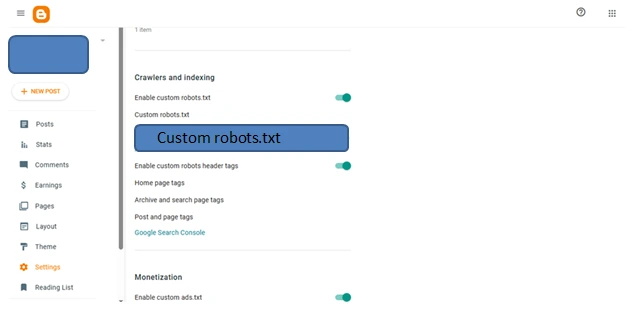
How to Fix Robots.txt in Blogger:
1: Go to Blogger Dashboard > Settings.
2: Scroll to Crawlers and Indexing.
3: Click Custom robots.txt and check if it contains this code:
User-agent: *
Allow: /
Disallow: /search
Sitemap: https://yourdomain.com/sitemap.xml
4: Save the changes and test the new settings in Google Search Console.
Step 4: Remove Noindex Tags from Blogger Settings
Sometimes, pages may have a noindex tag that prevents them from appearing in search results.
How to Remove Noindex Tags in Blogger:
1: Go to Blogger Dashboard > Settings.
2: Scroll to Custom robots header tags.
3: Ensure that:
- Homepage: Checked for all and max-image-preview:large.
- Archive and search pages: NOT checked for “noindex”.
- Posts and pages: Checked for all.
- Save changes and re-submit your sitemap.
Step 5: Improve Content and Internal Linking
If Google crawled your page but didn’t index it, your content might not be unique or valuable enough.
Tips to Improve Content for Indexing:
- Add at least 300+ words per post.
- Use high-quality images and add proper alt text.
- Write engaging meta descriptions (under 160 characters).
- Avoid duplicate content from other websites.
- Internally link to other relevant blog posts.
- Ensure pages load fast and are mobile-friendly.
Step 6: Request Manual Indexing
If your pages are still not indexed, you can request Google to manually review them.
How to Request Indexing in Google Search Console:
1: Open Google Search Console.
2: Click Inspect URL in the top search bar.
3: Enter the URL of the affected page.
4: Click Request Indexing.
This forces Google to recrawl the page faster.
Step 7: Check for Manual Actions and Google Penalties
If your website violates Google’s guidelines, it may be penalized, preventing indexing.
How to Check for Google Penalties:
- Go to Google Search Console.
- Click Security & Manual Actions.
- If you see any manual action listed, follow Google’s recommendations to fix it.
Final Thoughts
Fixing indexing issues in Blogger requires patience and a step-by-step approach. Here’s a quick recap of what to do:
Check Google Search Console for specific errors
- Submit or update your sitemap
- Fix the robots.txt file
- Remove noindex tags
- Improve content and internal linking
- Request manual indexing if needed
- Check for Google penalties
By following these solutions, you can ensure that your Blogger site gets properly indexed, leading to better search visibility and increased traffic.
Got any questions? Let us know in the comments below!
Disclaimer
This article is for informational purposes only. While we strive to provide accurate and up-to-date information, search engine algorithms constantly change, and results may vary. Always refer to Google’s official guidelines and consider consulting an SEO expert for specific concerns about your website’s indexing issues.
Also Read
How to Dual Boot Windows 11 and Linux: A Complete Beginner’s Guide