You press a button, the screen lights up, and a few seconds later you’re staring at a login prompt or desktop. It feels instant. It isn’t. What happens when you press the power button on a Linux PC is actually a tightly choreographed relay race between hardware, firmware, and software, and every leg of that race has to finish cleanly before the next one starts.
Most guides gloss over this with a one-line answer: “BIOS loads the bootloader, bootloader loads the kernel, kernel starts the system.” That’s technically true and practically useless if you’re trying to fix a machine that hangs on a black screen or debug why a service starts before the network is ready. This post walks through every stage in real detail, using the actual tools, files, and version numbers you’ll encounter on a Linux box in 2026.
Quick Overview: The Six Stages of Linux Boot
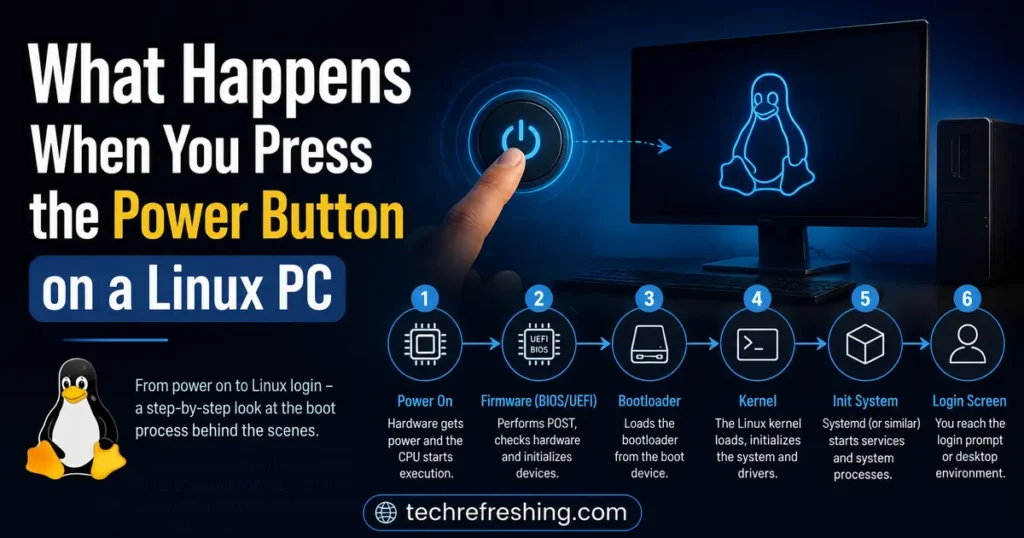
Before diving deep, here’s the flight path:
- Power-on hardware initialization – motherboard, CPU, and RAM checks
- Firmware stage – BIOS or UEFI takes over
- Bootloader stage – GRUB (or systemd-boot) finds and loads a kernel
- Kernel initialization – the Linux kernel unpacks itself and takes control
- Init system startup – systemd (or an alternative) becomes PID 1
- User space and login – services, network, and your desktop or shell appear
Each of these has its own failure modes, its own log files, and its own set of commands you can use to inspect what actually happened. Let’s go stage by stage.
Stage 1: Power-On and Hardware Initialization
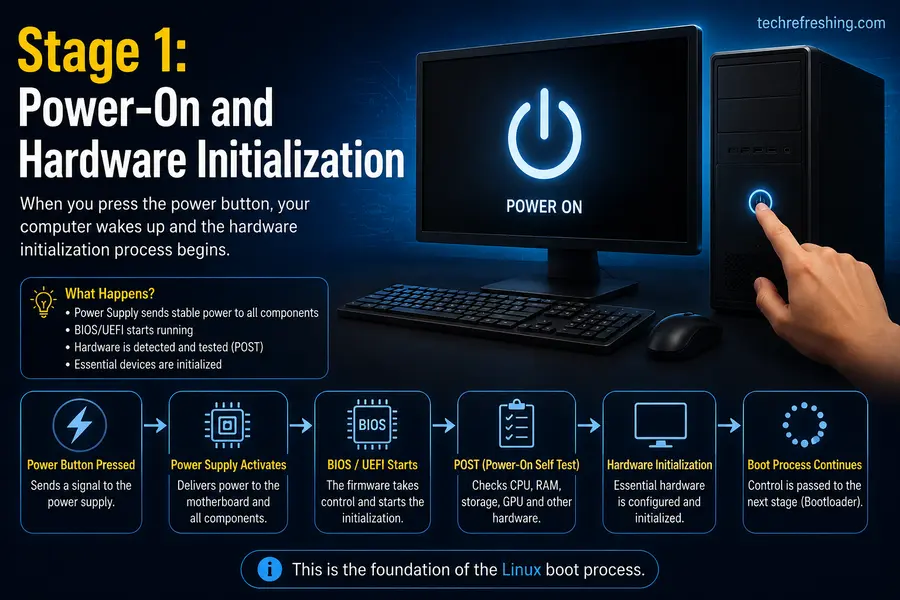
The instant you press the power button, nothing “Linux” happens yet. The power supply sends voltage to the motherboard, and the motherboard’s power management controller checks that voltage rails are stable before it even lets the CPU wake up. This takes a few hundred milliseconds on modern boards, though cheap or aging power supplies can stretch this out and cause the classic “won’t turn on the first time” symptom.
Once power is stable, the CPU resets to a known state and begins executing instructions from a fixed memory address that’s mapped to the motherboard’s firmware chip. At this point there is no operating system, no kernel, and no filesystem in the picture at all — just the CPU reading raw instructions burned into flash memory.
This is also when your RAM gets tested and initialized, memory timings get set based on the SPD chip on your RAM sticks, and the CPU figures out how many cores it has and at what base clock to run. On desktop boards, you’ll often see this reflected as a brief “training memory” delay before the manufacturer’s splash screen even shows up.
Stage 2: Firmware Takes Over — BIOS vs UEFI
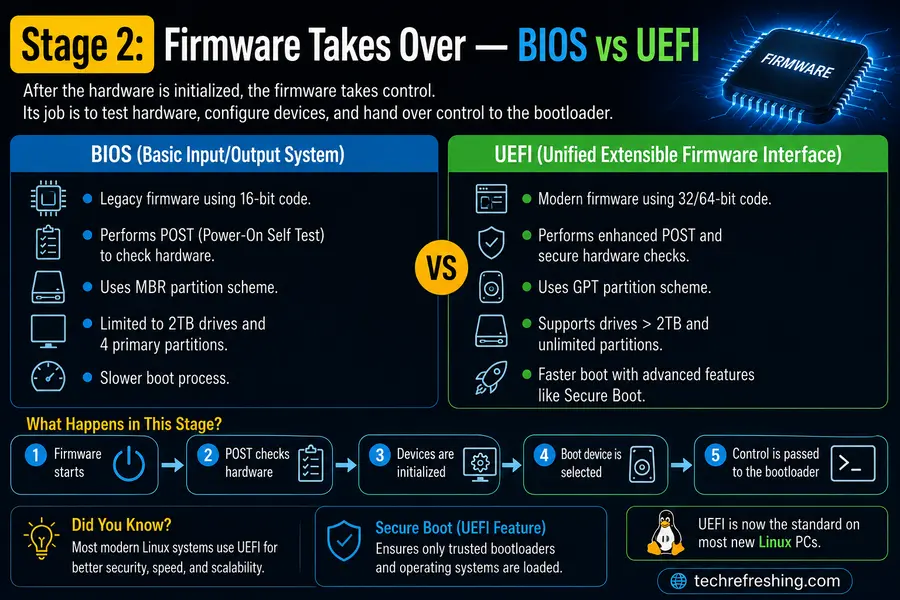
This is where most people’s mental model gets outdated. Legacy BIOS is functionally dead on new hardware; virtually every PC built since around 2012 ships with UEFI (Unified Extensible Firmware Interface), and Linux distributions have fully embraced it, including Secure Boot support.
What the firmware actually does
- Runs a Power-On Self Test (POST) to confirm CPU, RAM, and critical buses are functional
- Initializes basic peripherals (keyboard, storage controllers, graphics)
- Reads the boot order from NVRAM and looks for a valid bootloader
- On UEFI systems, reads the EFI System Partition (ESP) — a small FAT32 partition, typically mounted at
/boot/efi— and looks for a.efiexecutable - If Secure Boot is enabled, verifies the bootloader’s cryptographic signature against keys stored in firmware before handing off control
BIOS vs UEFI: the real differences
| Aspect | Legacy BIOS | UEFI |
|---|---|---|
| Boot process | Reads Master Boot Record (MBR), first 512 bytes of disk | Reads .efi file from EFI System Partition |
| Disk size limit | 2TB (due to MBR partition table) | No practical limit (uses GPT) |
| Secure Boot | Not supported | Supported natively |
| Boot speed | Slower, sequential device scanning | Faster, direct file lookup |
| Pre-OS environment | 16-bit real mode, very limited | Full 32/64-bit environment, can run drivers and apps |
| Multi-OS boot menus | Handled entirely by bootloader | Can be handled by firmware itself |
If you’ve ever installed Ubuntu, Fedora, or Debian in the last few years, the installer almost certainly created a GPT partition table and an EFI System Partition without asking you much about it. That’s UEFI doing its job quietly in the background.
Stage 3: The Bootloader — GRUB and Its Alternatives
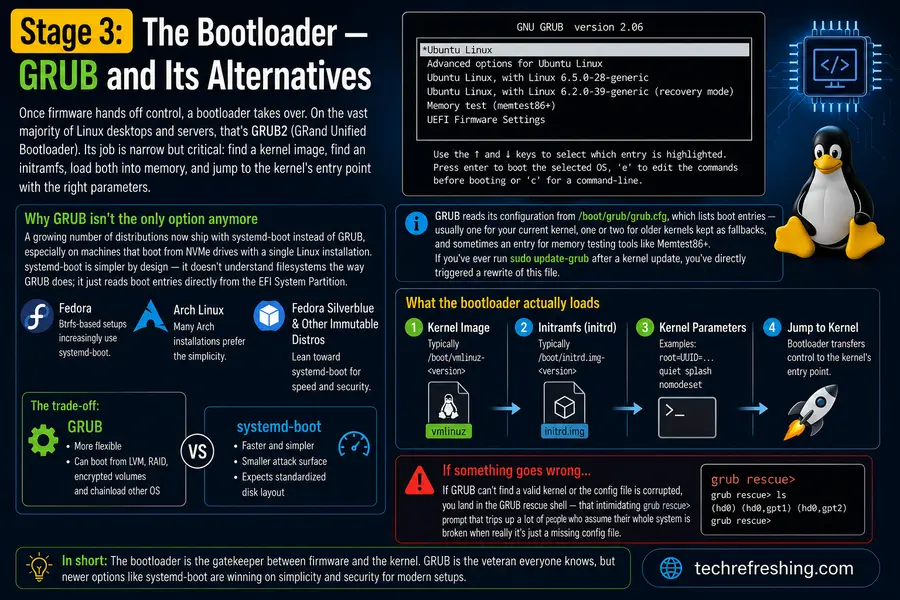
Once firmware hands off control, a bootloader takes over. On the vast majority of Linux desktops and servers, that’s GRUB2 (GRand Unified Bootloader). Its job is narrow but critical: find a kernel image, find an initramfs, load both into memory, and jump to the kernel’s entry point with the right parameters.
GRUB reads its configuration from /boot/grub/grub.cfg, which lists boot entries — usually one for your current kernel, one or two for older kernels kept as fallbacks, and sometimes an entry for memory testing tools like Memtest86+. If you’ve ever run sudo update-grub after a kernel update, you’ve directly triggered a rewrite of this file.
Why GRUB isn’t the only option anymore
A growing number of distributions now ship with systemd-boot instead of GRUB, especially on machines that boot from NVMe drives with a single Linux installation. systemd-boot is simpler by design — it doesn’t understand filesystems the way GRUB does; it just reads boot entries directly from the EFI System Partition. Fedora’s Btrfs-based setups, several Arch installations, and increasingly, immutable distributions like Fedora Silverblue lean toward this simpler chain.
The trade-off is real: GRUB is more flexible (it can boot from LVM, RAID, encrypted volumes, and chainload other operating systems), while systemd-boot is faster and has a much smaller attack surface, but expects a more standardized disk layout.
What the bootloader actually loads
- The kernel image, typically
/boot/vmlinuz-<version> - The initramfs (initial RAM filesystem), typically
/boot/initrd.img-<version>— a compressed cpio archive containing just enough drivers and tools to mount your real root filesystem - Kernel command-line parameters, things like
root=UUID=...,quiet splash, ornomodesetif you’re troubleshooting graphics issues
If GRUB can’t find a valid kernel or the config file is corrupted, you land in the GRUB rescue shell — that intimidating grub rescue> prompt that trips up a lot of people who assume their whole system is broken when really it’s just a missing config file.
Stage 4: Kernel Initialization
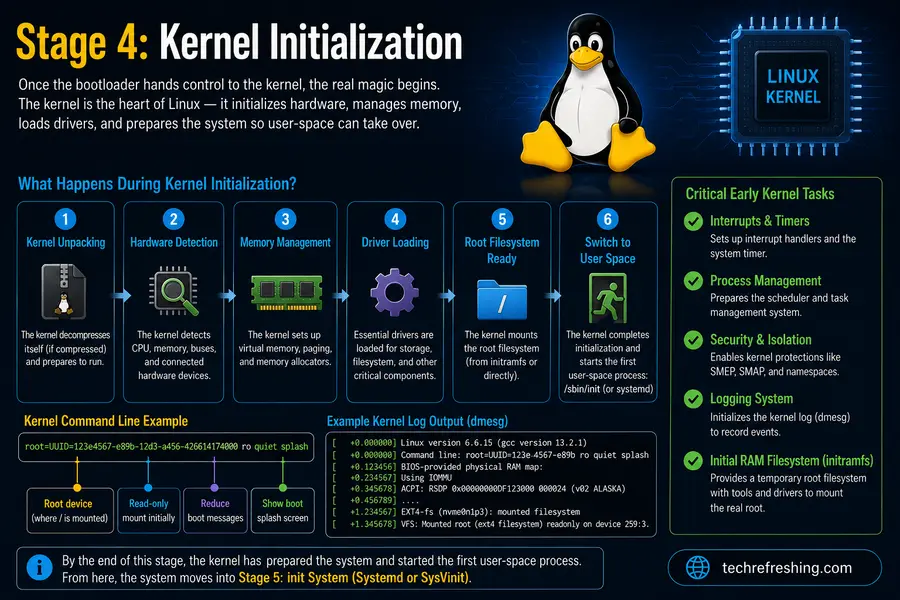
This is the part people usually mean when they say “Linux boots.” The bootloader jumps into the kernel image, and from here the Linux kernel itself is in charge.
As of August 2026, the mainline kernel development branch sits at Linux 7.2, with 7.1.6 as the current stable release and 6.18.42, 6.12.101, and 6.6.148 as the actively maintained long-term support (LTS) branches, all patched as recently as August 3, 2026, according to release listings on kernel.org. Most production servers and enterprise distributions you’ll actually touch are running one of those LTS trees rather than chasing the bleeding edge, which matters if you’re comparing “what kernel am I on” output against tutorials that assume the newest release.
What the kernel does on boot
- Decompresses itself — kernel images are compressed to save space on the boot partition, so the first job is self-extraction into memory
- Initializes core subsystems — memory management, process scheduler, interrupt handling
- Mounts the initramfs as a temporary root filesystem
- Loads drivers from the initramfs needed to access your real disk — this matters especially for NVMe controllers, RAID arrays, or encrypted LUKS volumes, where the driver isn’t built into the kernel itself
- Switches root (
pivot_rootorswitch_root) from the temporary initramfs to your actual root filesystem on disk - Starts PID 1 — the very first user-space process
That initramfs step is why disk encryption prompts (like a LUKS passphrase) appear so early in the boot sequence, before you see any distribution logo or desktop environment. The kernel literally cannot read your encrypted root filesystem without that passphrase, so it has to ask for it from inside the temporary environment.
Stage 5: Init System Startup — systemd Takes the Wheel
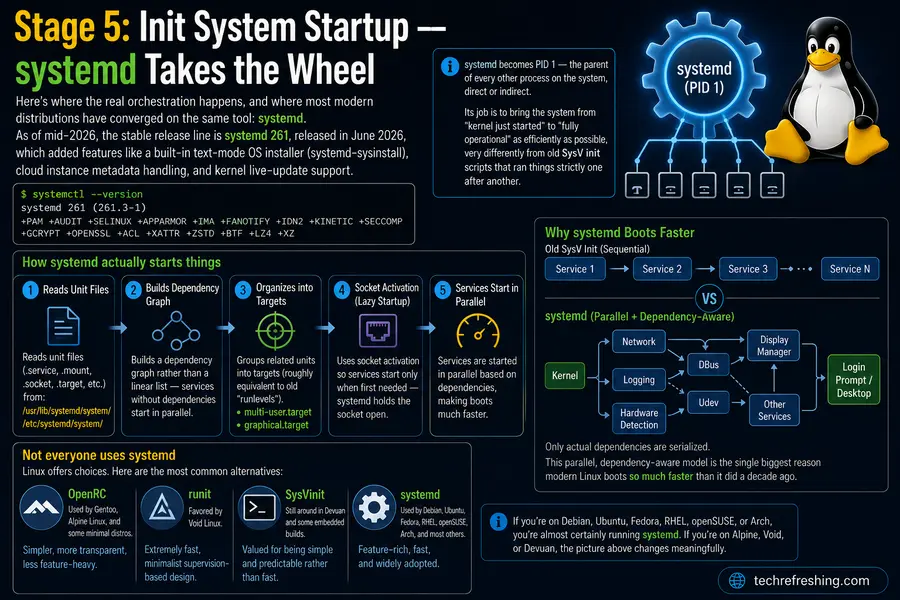
Here’s where the real orchestration happens, and where most modern distributions have converged on the same tool: systemd. As of mid-2026, the stable release line is systemd 261, released in June 2026, which added features like a built-in text-mode OS installer (systemd-sysinstall), cloud instance metadata handling, and kernel live-update support. Distributions ship whichever version was current when they were built, so don’t be surprised if systemctl --version on a server shows something a version or two behind what a brand-new desktop install reports.
systemd becomes PID 1 — the parent of every other process on the system, direct or indirect. Its job is to bring the system from “kernel just started” to “fully operational” as efficiently as possible, and it does this very differently from old-school SysV init scripts, which ran things strictly one after another.
How systemd actually starts things
- Reads unit files (
.service,.mount,.socket,.target, etc.) usually stored in/usr/lib/systemd/system/and/etc/systemd/system/ - Builds a dependency graph rather than a linear list — services that don’t depend on each other start in parallel
- Groups related units into targets (roughly equivalent to old “runlevels”) —
multi-user.targetfor a full non-graphical system,graphical.targetfor a desktop environment - Uses socket activation so a service doesn’t need to be fully running before another process can start talking to it — systemd just holds the socket open and starts the real service lazily on first connection
This parallel, dependency-aware model is the single biggest reason modern Linux boots so much faster than it did a decade ago. A system with SysV init might start twenty services one after another, each waiting for the previous to finish. systemd can fire off networking, logging, and hardware detection simultaneously, only serializing where there’s an actual dependency.
Not everyone uses systemd
It’s worth being honest about the alternatives, because “Linux boot” isn’t a single monolithic process across every distribution:
- OpenRC — used by Gentoo, Alpine Linux, and some minimal distros; simpler, more transparent, less feature-heavy
- runit — favored by Void Linux; extremely fast, minimalist supervision-based design
- SysVinit — still around in Devuan and some embedded builds, valued specifically for being simple and predictable rather than fast
If you’re on Debian, Ubuntu, Fedora, RHEL, openSUSE, or Arch, you’re almost certainly running systemd. If you’re on Alpine, Void, or Devuan, the picture above changes meaningfully.
Stage 6: User Space, Services, and Login
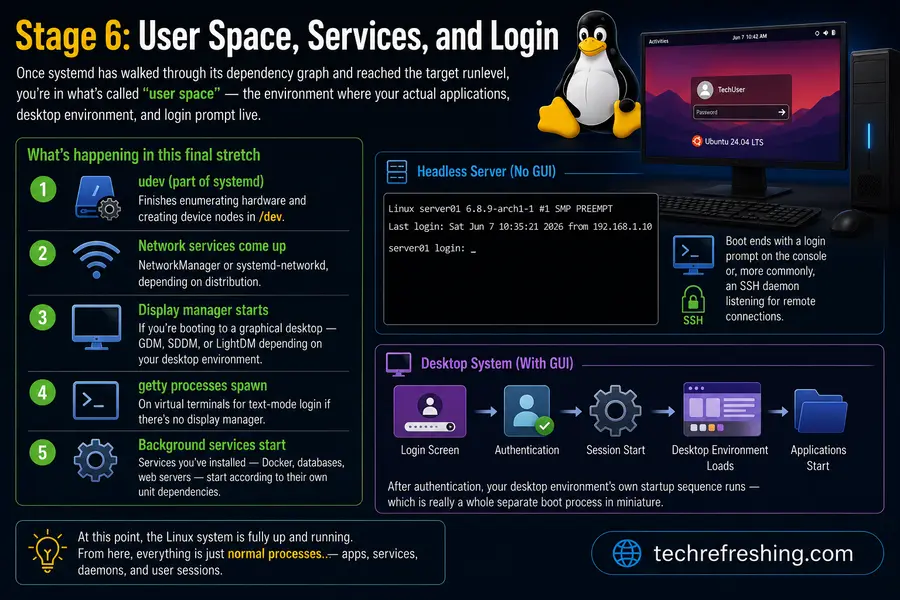
Once systemd has walked through its dependency graph and reached the target runlevel, you’re in what’s called “user space” — the environment where your actual applications, desktop environment, and login prompt live.
What’s happening in this final stretch
- udev (part of systemd) finishes enumerating hardware and creating device nodes in
/dev - Network services come up — NetworkManager or systemd-networkd, depending on distribution
- Display manager starts if you’re booting to a graphical desktop — GDM, SDDM, or LightDM depending on your desktop environment
- getty processes spawn on virtual terminals for text-mode login if there’s no display manager
- Background services you’ve installed — Docker, databases, web servers — start according to their own unit dependencies
For a headless server, this stage ends with a login prompt on the console or, more commonly these days, an SSH daemon listening for remote connections. For a desktop, it ends with your login screen, and after authentication, your desktop environment’s own startup sequence (which is really a whole separate boot process in miniature).
How to Actually See This Process Yourself
Reading about boot stages is one thing; watching them happen is more useful for real troubleshooting. A few commands worth knowing, documented in detail in the systemd man pages:
systemd-analyze— shows total boot time, split between firmware, bootloader, kernel, and user spacesystemd-analyze blame— lists every service by how long it took to start, sorted slowest firstsystemd-analyze critical-chain— shows the actual dependency chain that determined your slowest boot pathjournalctl -b— shows the full system log for the current boot, including kernel messagesjournalctl -b -1— same, but for the previous boot, useful after a crash
Running systemd-analyze blame on a fresh Ubuntu or Fedora install with an NVMe drive typically shows total boot times well under 15 seconds from GRUB to login screen, with the kernel and initramfs stage often taking under two seconds combined. Older SATA SSD or spinning-disk systems, especially with a lot of installed services, can stretch that well past 30 seconds, and it’s almost always one or two slow services (unattended-upgrades, cloud-init, or a misconfigured network wait) that account for most of the delay.
Common Boot Problems and Where They Happen
Knowing the stages actually helps you triage a broken boot faster, because the symptom tells you which stage failed:
- No lights, no fans, nothing → Stage 1, hardware/power issue, not a Linux problem at all
- Manufacturer logo shows, then black screen, no bootloader menu → Stage 2, firmware can’t find a valid bootloader, check boot order and ESP integrity
- “grub rescue>” prompt → Stage 3, GRUB config or
/bootpartition issue - Kernel panic message, mentions of “unable to mount root fs” → Stage 4, usually a missing driver in initramfs or wrong UUID in kernel parameters
- Boots to a black screen with a blinking cursor, no login prompt → Stage 5 or 6, a critical systemd target failed, check with
journalctl -xb - Login screen appears but graphical session crashes immediately → Stage 6, display manager or graphics driver issue, not a boot-process issue at all
Frequently Asked Questions
What happens when you press the power button on a Linux PC?
Power flows to the motherboard, firmware (UEFI or BIOS) runs hardware checks, a bootloader like GRUB loads the Linux kernel, the kernel initializes hardware and mounts the root filesystem, and then systemd starts all background services until you reach a login prompt or desktop.
How long should a Linux PC take to boot?
On modern hardware with an SSD or NVMe drive, 10–20 seconds from power-on to login screen is typical; anything over 40 seconds usually means a slow service is worth investigating with systemd-analyze blame.
What is the difference between BIOS and UEFI on Linux?
BIOS reads a Master Boot Record and is limited to 2TB disks with no native Secure Boot, while UEFI reads .efi files from a dedicated partition, supports larger disks via GPT, and natively supports Secure Boot.
Is GRUB the only Linux bootloader?
No — while GRUB2 is the most common, many modern distributions, especially those using Btrfs or simple single-OS setups, use systemd-boot instead, which is faster but less flexible.
What is PID 1 in Linux?
PID 1 is the first user-space process the kernel starts, almost always systemd on modern distributions, and it’s responsible for starting and supervising every other process on the system.
Why does my Linux PC ask for a password before showing the desktop?
If your root filesystem is encrypted with LUKS, the kernel needs that passphrase during the initramfs stage to unlock and mount the disk before it can even find the rest of the operating system, which is why the prompt appears before any desktop branding.
What replaced SysV init on most Linux distributions?
systemd replaced SysV init on the large majority of mainstream distributions because it starts services in parallel based on real dependencies instead of one at a time, cutting boot times significantly.
Wrapping Up
So, what happens when you press the power button on a Linux PC? In short: a relay race that starts in silicon and ends in software, moving from raw hardware checks, through firmware and a bootloader, into a kernel that takes control of the machine, and finally into systemd orchestrating dozens of services until you’re looking at a login screen. None of it is magic, and none of it is instant — it’s a sequence of well-defined handoffs, each one leaving a trail in logs you can actually read with tools like journalctl and systemd-analyze.
Understanding these stages isn’t just trivia. It’s the difference between panicking at a black screen and knowing exactly which log file to check first.
Disclaimer
This article is for general educational purposes. Exact boot behavior, file paths, and default tools can vary between distributions, hardware vendors, and firmware versions, so always check your own system’s documentation before making changes to bootloader or kernel configuration.